Untitled
Workflows, Best Practice guidance, Tips and Tricks to extract the best from Hammer Missions
Manual Facade Inspections with DJI Fly: Setup and Safety Checks
There are some time situations where using automated flight plans are not suitable for the operation. In these scenarios it may be an option to fly the drone manually to capture the necessary images. (Other options include attaching a camera to a telescopic pole or simply holding the drone to capture images)
The guide below, walks you through the essential setup points when using DJI the DJI Fly App v1.19.0 to capture aerial images manually. It covers both camera settings and some safety settings, to help you achieve high-quality image capture.
Overview
Manual facade inspections rely on steady drone piloting combined with the right camera and safety settings. The goal is to capture clear, overlapping images of the building while ensuring obstacle systems and return‑to‑home behaviour are configured for the environment.
Before You Fly: Close Other Mission Apps
Make sure any other drone mission apps are fully closed so DJI Fly can manage the controller and aircraft without conflict. On an Android tablet that means swiping the app away and checking the list of open apps to force stop if needed.
With other mission software closed, power on the remote control and the aircraft. The DJI Fly app will prompt to handle the controller; accept that prompt and allow the app to connect.
DJI Fly app camera view with telemetry and on‑screen camera controls, ready for controller connection
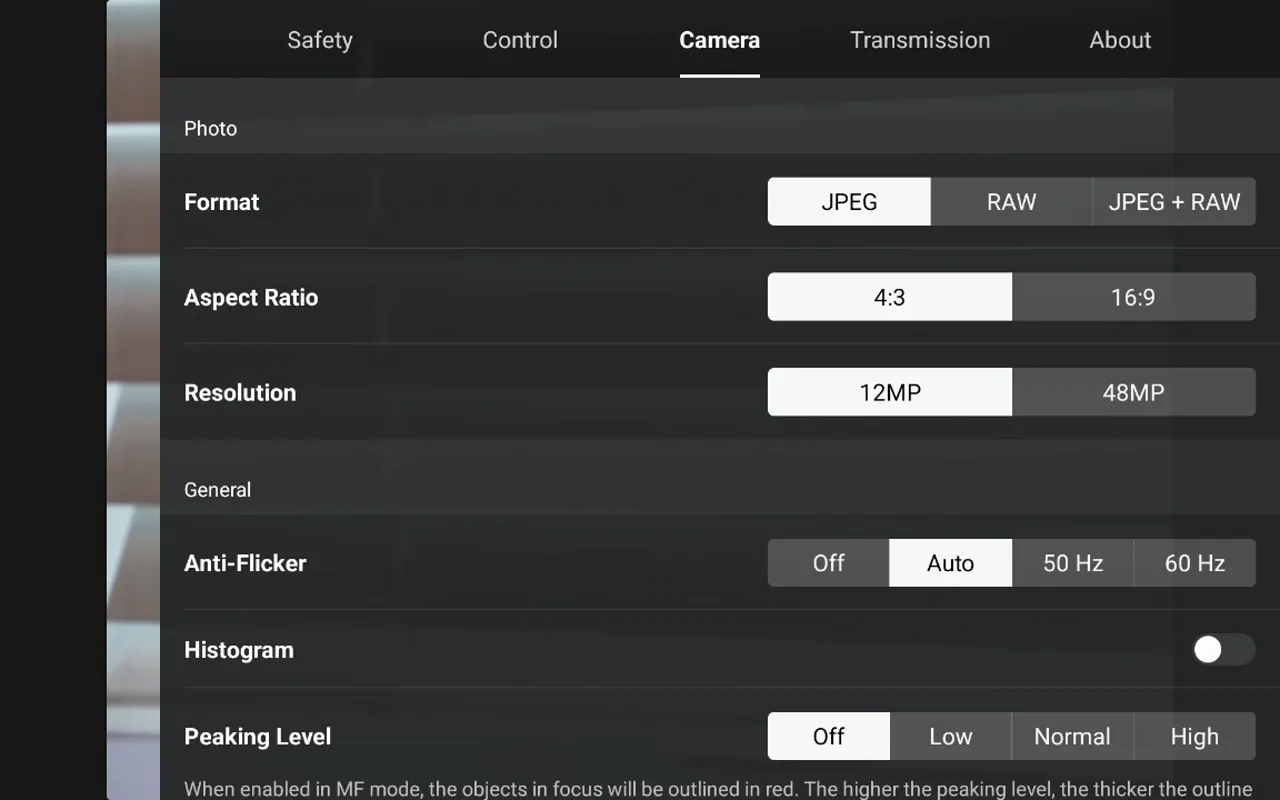
Camera Settings for Facade Inspection
Good images start with the camera. For manual facade capture, you want a balance between resolution and file size plus an aspect ratio that captures vertical surfaces optimally. Generally you will want to leave the Camera in Auto exposure and Auto focus mode.
- Aspect ratio: 4:3 is typically best for building facades.
- Resolution: Choose higher resolution if you need more detail. For example the DJI Mini 4 Pro drone offers a 48MP option. For routine inspections 12MP is usually sufficient and saves storage space.
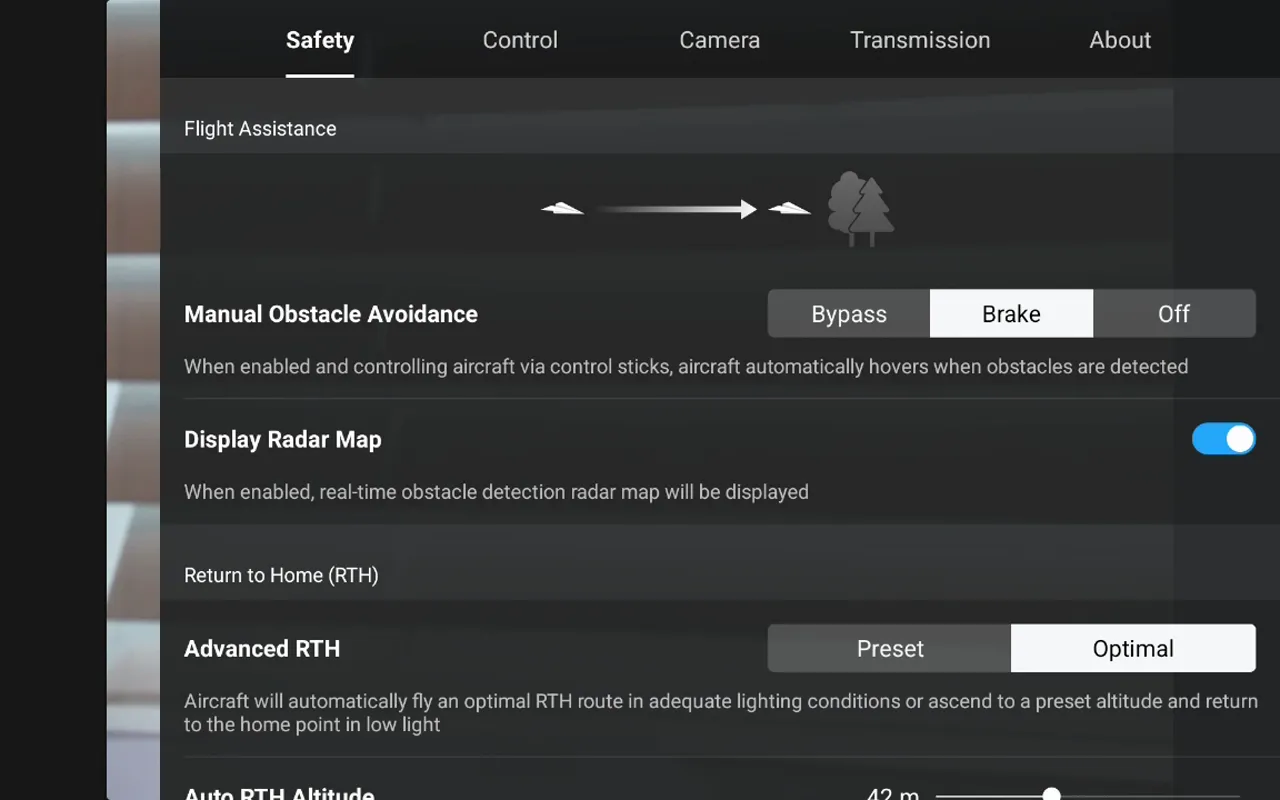
Safety Settings and Flight Limits
When flying manually, ensure you have suitable weather conditions (in particular low winds), configure the aircraft to protect itself and your surroundings. Key safety settings to check in DJI Fly include:
- Obstacle avoidance: Set to Brake so the drone stops if it detects an obstacle while you are flying towards it.
- Display radar map: Keep this on for a live visual indication of proximity to aircraft and obstacles.
- Advanced RTH: Enable advanced return to home to improve automatic behaviour if the aircraft loses connection or battery is low.
- Auto RTH altitude: Set this high enough to clear local obstacles such as parapets, cranes or nearby buildings.
- Max distance and max altitude: Limit these to the operational area you expect to fly within.
Shooting Strategy: Timed Intervals vs Manual Capture
Decide whether to capture images manually or use timed intervals. Each approach has advantages.
Timed intervals (Timed Shot)
Use the Time Shot option when you want consistent spacing between images during a smooth pass along the facade. Using the DJI Mini 4 Pro with the DJI Fly app, the smallest automated image capture interval is two seconds.
- Pros: Consistent overlap, hands-free capture during a steady flight, efficient for long facades.
- Cons: Might capture unwanted frames if you need to stop or hover unexpectedly.
DJI Fly app Timed Shot menu with 2 second interval selected and Photo mode
Manual capture
If you prefer full control over each frame, keep the camera mode on Single and use either the camera button on the remote or the on-screen shutter to take each photo. This is useful for targeted inspection of specific defects or when hovering to examine close details.
Step-by-step Setup Summary
- Close the Hammer Missions app and any other unnecessary apps, confirming that they are fully stopped.
- Power on the remote control, then the aircraft, allowing the DJI Fly App to connect to the controller.
- Open camera settings: set aspect ratio to 4:3 and choose resolution (12MP for routine, 48MP for high detail).
- Configure safety settings: obstacle avoidance = Brake, enable display radar map and advanced RTH, set appropriate RTH altitude.
- Set max distance and max altitude to match the inspection area.
- Choose shooting method: Time Shot with a 2 second interval for continuous capture, or Single mode for manual shots control via RC button.
Final Tips for Reliable Facade Inspections
- Avoid windy conditions as you may encounter wind vortexes and turbulent air around facades
- Plan your passes to ensure adequate (70-80%) image overlap between consecutive vertical images for inspection and possible photogrammetry.
- Avoid sudden inputs while using timed intervals to prevent motion blur between shots.
- Keep an eye on telemetry and the radar display to avoid other aircraft and obstacles.
- Adjust RTH altitude before takeoff if the site has unexpected vertical hazards.
“Before attempting a manual flight, the pilot should ensure that they are fully proficient at flying the aircraft manually and potentially with low GPS or no GPS signal”.
- With this in mind they should also ensure that they are familiar with the aircraft’s behaviour in a low GPS signal environment.
➡️Next Topic
Data Upload & Processing (Creating 2D Map / 3D Model)
⬅️Previous Topic
Manual Flight based Facade Capture: Practical Tips